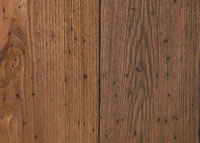
Quick reference guide for hardwood tools & definitionsAbove Grade A suspended floor located above ground level, with a minimum of 18 inches of ventilated air space below. Normally above a basement, but a suspended floor may also be above a crawl space. Abrasion...
Hardwood Flooring Reference Tool & Definitions
Hardwood Flooring Reference Tool & Definitions
Quick reference guide for hardwood tools & definitions
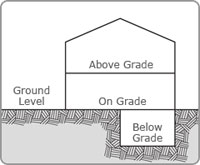
Above Grade
A suspended floor located above ground level, with a minimum of 18 inches of ventilated air space below. Normally above a basement, but a suspended floor may also be above a crawl space.
Abrasion Resistance
How well a surface resists being worn by rubbing or friction. Abrasion resistance does not describe hardness, but rather toughness.
Extra Resource: Article on World-Friendly Wood Finishes that will help enhance toughness of flooring.
AC Wear Layer
A durable wear layer that protects against wear, stains, and fading in laminate flooring.
Acclimation
Allowing the moisture content of new wood flooring to reach an equilibrium or balance with its surroundings before installation. (See Equilibrium Moisture Content, EMC)
Extra Resource: Article on Hardwood Floor Acclimation: When You Can Install
Acrylic Impregnated or Acrylic Infused
A generic term for wood-plastic composite flooring often used in commercial properties, acrylic impregnated wood is made by infusing wood with acrylic resin, so the color and finish are not only consistent on the surface, but throughout the wood as well. Although durable, acrylic impregnated wood floors cannot be refinished and are susceptible to water staining.
Adhesive
A substance that bonds the finished floor product to the substrate (the layer that underlies the floor product).
Air-Dried
Refers to wood dried by exposure to air (such as in a yard or shed) without artificial heat, as is used in kiln drying.
Aluminum Oxide
A protective coating for hardwood floors commonly used because of its strength (second in hardness to diamond).
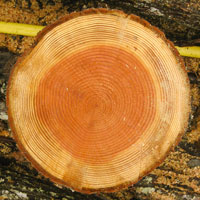
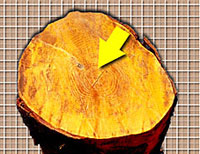
Annual Growth Ring
The layer of wood growth formed on a tree during a single growing season.
Asphalt Saturated Felt Paper
Asphalt-saturated products are used as vapor retarders and typically come in rolls installed over the subfloor with the seams overlapping a minimum of 4 inches. Also referred to as #15 or #30 felt, asphalt saturated felt paper meets industry standard ASTM D4869.
ASTM
The American Society for Testing and Materials develops and publishes voluntary technical standards for a wide range of materials, products, systems, and services. Although ASTM International standards are not required or enforced, they have been adopted by rules-making industry and governmental bodies.
ASTM (modified) D-4944-043
Also known as the Calcium Carbide (CM) Test where a mid-depth sample of the screed is taken and allowed to react with calcium carbide reagent. Upon reacting, the mixture releases acetylene gas, the amount of which indicates the level of moisture in the sample.
ASTM F-1869
The American Society for Testing and Materials (ASTM) developed this standard test for determining the rate of moisture vapor emission from the surface of a concrete floor using anhydrous calcium chloride. All concrete subfloors emit some amount of moisture in vapor form, and all floor coverings are susceptible to failure from excessive moisture vapor emissions. The calcium chloride moisture test results are used to determine whether the floor is acceptable to receive resilient floor covering. The calcium chloride moisture test is the industry standard for making this determination and is a practical, well-established and accepted test of dynamic moisture.
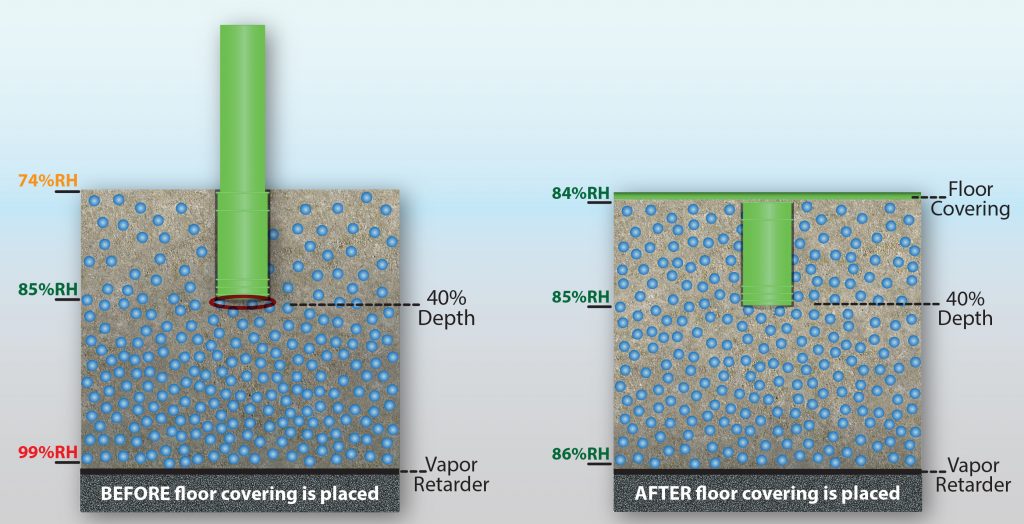
ASTM F-2170
The American Society for Testing and Materials (ASTM) developed this standard test for determining relative humidity in concrete floor slabs using in situ probes (moisture testing sensors inside the slab itself). In-situ probes measure relative humidity (RH), providing a composite picture of overall slab moisture levels. Excessive moisture permeating from floor slabs after installation can cause floor covering delamination, peeling, blistering, staining and sweating.
Base/Shoe Combination
Molding piece used along the outer most edges of the floor where it meets the wall. The base/shoe combo is attached to baseboard molding to cover expansion space and is the alternative to a quarter-round in profile.
Bastard Sawn
See Rift Sawn.
Below Grade
Below ground level; partially or completely below the surrounding ground level and in direct contact with the ground or with fill which is in direct contact with the ground.
Beveled Edge
A type of wood flooring edge that has a “v” shaped groove commonly used in informal settings that can also help hide uneven subflooring or differences in plank thickness.
Blind Nailing
Putting nails into the grooves of tongue-and-groove flooring at a 45-degree angle.
Board Foot
A unit of measurement of lumber represented by a board 1 foot long, 12 inches wide and 1 inch thick (or its cubic equivalent).
Board Width
The width of the individual wood boards that make up the floor. “Strips” are narrow boards measuring less than 3 inches wide. “Planks” measure more than 3 inches wide, and “wide planks” are more than 5 inches wide.
Borders
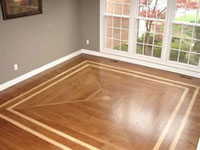 Wood pieces in simple or intricate designs that frame and customize a flooring installation.
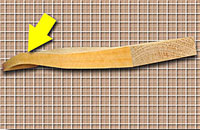
Bow
A type of warping or deviation from flatness in wood that is a result of stress and shrinkage from the uneven drying of lumber. A bow forms along the length of the face of the wood.
Bull Nose
A smooth, rounded trim installed where flooring meets wall.
Burl
A swirl or twist in wood grain that does not contain a knot. Burls are commonly found near knots and in tree stumps where limbs have branched out.
Chatter Marks or Chatter
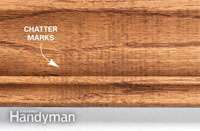 A rippling pattern of half-circle marks that appear on hardwood floor surfaces as a result of improper sanding.
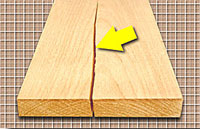
Check
A crack that occurs on the ends and surfaces of lumber during drying. Checking is caused by shrinkage differences between the surface and core of drying lumber. Since the ends and surfaces dry first, they tend to shrink first, but are restrained by the swollen core. This results in stresses building up near the surfaces which, if they become too great, cause the lumber to check.
Checking (finish)
Checking of finish of wood flooring appear as small, uniformly spaced cracks in the finish that run parallel with the grain of the wood. Checking is the result of stresses created from shrinking and swelling of the wood, usually caused by exposure to extreme heat or cold, or extremely dry or wet environment.
Cleat
A barbed fastener commonly used to fasten hardwood flooring.
Color Change
 Visual changes in the color of wood. Most commonly caused by exposure to light, deprivation of light and air, oxidation or other chemical reaction.
Color Variation
A natural variation in light and dark tones of wood that appear from board-to-board.
Color Wash
Paint is thinned with glaze to create a subtle wash of color over hardwood floor.
Compression Set
Caused when wood strips or parquet slats absorb excess moisture and expand to the point that the cells along the edges of adjoining pieces in the floor are crushed. This results in cracking when the floor returns to its normal moisture content.
Extra Resource: Article on flooring problems that are moisture related
Coniferous
See Softwoods.
Crook
Warping along the length of the edge of a board causing a side bend. Crooks occur when one edge shrinks more in length than the other.
Cross Directed
Material laid perpendicular to the material below it.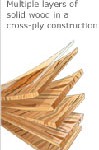
Cross-ply Construction
Engineered hardwood created by stacking planks in alternating directions.
Crowning
Warping that causes the center of the wood board to appear higher than the edges. The opposite of cupping.
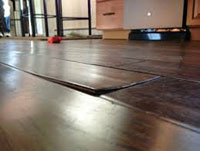
Extra Resource: Article on Cupping and Crowning
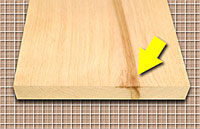
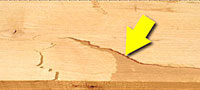
Cupping
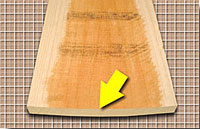
Image from http://www.westcoasthardwoods.net
Extra Resource: Article on Cupping and Crowning
Deciduous
See Hardwoods.
Deformed fasteners
Includes ring-shank and screw-shank nails.The sides of deformed fasteners are not smooth, and the head shape may be irregular
Delamination
 The separation of layers in an engineered wood floor or layers of stain and/or coating caused by failure within the adhesive or between plies.
Diffuse-Porous Woods
Describes certain hardwoods where the pores are either uniform in size and evenly distributed throughout the wood’s annual ring, or gradually decrease in size toward the outer border of ring. For example: hard maple, apple, cherry beech and holly.
Dimensional Stability
The ability of wood flooring to maintain its original dimensions throughout its lifetime.
Distressed
 Design term that describes wood flooring texture that has a time-worn, antique look achieved through scraping, scratching or gouging.
DIY (Do-It-Yourself)
Describes projects that can be installed without a professional. DIY levels vary from easy to difficult, depending on the necessary tools and experience.
Drywall
Interior wall and ceiling covering material also known as plasterboard, wallboard, gypsum board, or LAGYP. Drywall is made of gypsum plaster pressed between two thick sheets of paper that is applied in large sheets or panels.
Durability
Describes wood’s ability to withstand the conditions and destructive products it comes in contact with in actual usage without noticeable changes in its properties or appearance.
Eased Edge
A type of wood flooring edge that is shallower and more rounded than a “v”-shaped, beveled edge.
Edge Detail
Describes the way flooring board edges and ends are cut, typically square, eased, beveled or microbeveled.
End Joint
Where two pieces of flooring are joined together end to end.
End Lifting
Swelling of the top layer of engineered wood flooring at an end joint.
End-Matched
In tongue-and-groove flooring, the individual pieces have a tongue milled on one end and a groove milled on the opposite end. When butted together, the tongue of one piece fits into the groove of the next piece.
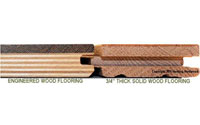
Engineered
 A manufacturing process that bonds layers of veneer or lumber (or plies) with an adhesive in a cross-ply construction (where the wood grains are perpendicular to each other) in order to increase dimensional stability. The top layer is the wood species and color visible when installed.
Extra Resource: Article on Engineered Floors
Equilibrium Moisture Content (EMC)
The point at which wood neither gains nor loses moisture when surrounded by air at a given relative humidity and temperature.
Expansion
When moisture causes swelling and contracting, the dimensions of a wood floor change.
Extra Resource: Article on Expansion and Shrinkage in Wood
Expansion Gap
An area around the perimeter of a wood floor left open to account for expansion.
Expansion Spacing
Amount of space left at the baseboard to allow for expansion.
Extra Resource: Article on Shrinkage & Swelling
Face Nail
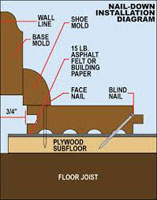 Technique where nails are installed perpendicular to the surface of the wood flooring, rather than at a concealed angle (blind nailing).
Fading
Loss of color that results when wood flooring is exposed to light, heat or other destructive agents.
Feature Strip
Wood accent used at the threshold or borders of a room, usually of a contrasting color or species.
Fiberboard
Engineered wood made of wood fibers, including particle board, medium-density fiberboard (MDF), and hardboard. For pieces that will be visible, a veneer of wood is often glued onto fiberboard to give it the appearance of conventional wood.
Fiber Saturation Point
When wood’s cell walls are saturated with water, and the cell cavities are free from water. This is usually taken as approximately 30 percent moisture content, based on oven-dry weight.
Figure
Naturally occurring markings or designs on surface of wood produced by annual growth rings, knots or other deviations in the regular grain.
Filler
A substance used in woodworking to fill holes and irregularities in planed or sanded surfaces before applying finish coatings. Wood filler is often a commercial putty, plastic wood or other material mixed to the consistency of putty.
Filled Face
A smooth, piano-like finish on wood.
Fillets
Small components that make up finger-block parquet, also called fingers or slats. Fillets can also refer to the top layer of some engineered wood flooring.
Fingers
See Fillets.
Finger-block
Parquet made from small strips of wood assembled together. See Fillets.
Finish
The surface coating on pre-finished hardwood flooring, usually either a UV-cured urethane or UV-cured urethane with aluminum oxide finish. On laminate, finish is a clear wear layer that protects from high abrasion, fading, stains and wear-through.
Extra Resource: Article on World-Friendly Wood Finishes
Fire Resistance
The property of a material to withstand fire. Certain wood species naturally provide greater fire resistance than others. Classes are I-II-III or A-B-C, with Class I or A being the most fire resistant.
Fire Retardant
A chemical used to reduce flammability or to retard the spread of a fire over a surface.
Flag
A heavy dark mineral streak in wood that is shaped like a banner.
Flag Worm Hole
 One or more worm holes surrounded by a mineral streak.
Flame Spread
Also known as surface burning characteristics rating, flame spread is a ranking of a material’s propensity to burn rapidly and spread flames. The best known test for developing this rating is the American Society for Testing and Materials (ASTM) Test Method E-84, commonly known as the tunnel test.
Flat Sawn (Plain Sawn)
When lumber is cut from logs, it is typically cut in one of three ways: quarter sawn, rift sawn or flat (plain) sawn, depending on how the log is oriented to the saw. Flat sawn is cut into long planks where the rings run parallel to the board and is the most common and least expensive wood.

Flecks
Quarter sawn wood (particularly oak) will also often display a pattern of flecks in subtle ribbon-like patterns across the straight grain. This ray pattern has made quarter sawn wood especially desirable for furniture and decorative paneling. See Medullary Rays.
Floating Floor
 Flooring panels that are connected together by adhesive or mechanical connectors and therefore do not need to be nailed or glued to a subfloor.
Flow
How a floor coating levels or spreads into a smooth, uniform film and thickness before hardening.
Flush Reducer
A wood molding that provides a gradual transition between floor surfaces of different heights and from room to room.
Flush Stair Nose
A wood molding that provides a smooth transition between the riser edge and the hardwood flooring on a step.
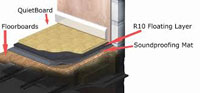
Foam Underlayment
Installed under flooring to reduce sound and smooth minor subfloor irregularities.
Forest Stewardship Council (FSC)
An independent, non-governmental, non-profit organization that promotes the responsible management of the world’s forests.
Gloss Level
How reflective a dry film is. Used interchangeably with “sheen,” gloss level can affect a paint’s color. Levels include: high gloss, semi-gloss, low gloss, and ultra-low gloss.
Grade Level
Describes the level of construction relative to the ground around it. Below grade is below ground level, on grade is at ground level, and above grade is above ground level.
Grain
 The visible lines in wood that show natural growth rings.
Graininess
The objectionable appearance of small, grain-like particles in a finishing material.
Hand-scraped or Hand Sculpted
Boards are individually scraped to create unique, one-of-a-kind flooring.
Hardened Steel Pin
Specialty fastener designed to penetrate and hold concrete, steel and other substrates, typically installed with powder, pneumatic or gas-powered tools.
Hardness
Describes how wood or finishing material withstands denting or marking when pressure is exerted on it.
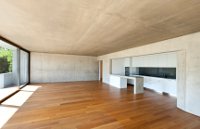
Hardwood
Wood of deciduous, broadleaved trees (such as oak, ash, or beech) as opposed to that of conifers, or softwoods. The term does not refer to the actual hardness of the wood.
Heartwood
http://www.westcoasthardwoods.net/definitions.html
Heavy Streaks
Marks on wood that are of sufficient size and density to severely mar its appearance.
High-density Fiberboard (HDF)
Used to make engineered hardwood, HDF is made by compressing fibers of wood chips with an adhesive to create a board that is more stable than plywood.
High-pressure Laminate (HPL)
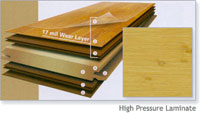 Process for making laminate flooring in which the surface, inner layers and backing are fused in a multi-step press operation.
Honeycombing
Check damage on wood’s interior fibers often not visible at the surface. Honeycombing occurs during the final drying stages, when internal fibers begin to separate against the wood grain, causing structural weakening without being visible from the outside.
Humidity
The amount of water vapor in the air. See Relative Humidity.
Hygrometer
 An instrument for measuring the degree of humidity or relative humidity of the atmosphere.
Hygroscopic
A substance’s ability to absorb and retain moisture, or lose or resist moisture. Wood is hygroscopic, as it expands with absorption of moisture and its dimensions become smaller when moisture is lost.
Extra Resource: Hygroscopic: What That Means For Your Floor
In Situ
A Latin term that means “in place” or “on site.” Moisture testing of concrete slabs is often done using “in situ” probes. See ASTM F-2170.
Extra Resource: ASTM F-2170 Explained
Installation Level
The grade of levels of the installation site.
Interlocking (Interlocking Floating)
 Flooring panels that are connected together by mechanical connectors and therefore do not need to be nailed or glued to a subfloor. See Floating Floor.
Intensity
A color’s purity or degree of hue as seen by the eye.
Janka Hardness
A hardness rating for wood species determined by the amount of force it takes to drive a .444 inch steel ball into a plank of wood .222 inches in diameter.
Extra Resource: Hardness Testing
Jointed Flooring
Strip flooring manufactured with square edges and no tongue or groove that is usually end-matched. Used principally for factory floors where the square edges make replacement of strips easier, jointed flooring is usually birch, beech, hard maple or pecan.
Joist
 A length of timber or steel that supports part of the structure of a building, typically arranged in parallel series to support a floor or ceiling.
Kiln
A chamber that uses artificial heat for drying lumber and other wood products. Kilns have controlled air flow, temperature and relative humidity.
Kiln-Dried
Refers to wood dried in a kiln. See Kiln.
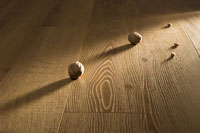
Knot
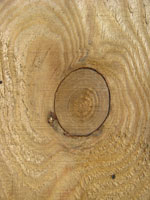 The portion of a branch or limb that has been surrounded by subsequent growth of the trunk or other portions of the tree. A knot appears on the sawed surface but is merely a section of the entire knot, its shape determined by the angle or direction of the cut.
Lacy Act
Prohibits all trade in plant and plant products illegally sourced from any U.S. State or foreign country.
Read & Find Out More Here
Locking Floating/Locking Installation System
See Floating Floor.
Lumber Grade
The National Oak Flooring Mfg. Assoc. (NOFMA) standard grading system for unfinished flooring that determines how many defects are acceptable in wood sold.
Manufacturing Defects
Defects in lumber produced during manufacturing. The machining process to produce dimensional lumber puts a large amount of stress on wood causing defects such as chipped grain, torn grain, skips in dressing, hit-and-miss (a series of surfaced areas with skips between them), variations in machining, machine burn, and mismatching.
Material Safety Data Sheet (MSDS)
 Lists information on the potential hazards (health, fire, reactivity and environmental), safety precautions and first aid information relating to chemical products.
Mechanic
A flooring installer, sander or finisher.
Medullary Rays
See Flecks.
Micro Bevel Edge
Features a v-shaped groove shallower than the bevel edge and provides just enough relief on the edges of the board to eliminate edge splitting and micro variations in finished board heights. A micro beveled edge will most likely disappear when the hardwood floor is refinished.
Mineral Spirits
Solvent used as a thinner and/or cleaner.
Mineral Streak
http://www.westcoasthardwoods.net/definitions.html
Mixed Media
Incorporating multiple materials in one piece of furniture, art, or installation. For example, wood flooring with slate, stone, ceramic, marble or metal accents.
Moisture Content
The amount of moisture in wood expressed as a percentage of the weight of oven-dried wood. The moisture content of wood is tied directly to the relative humidity of the surrounding air. The higher the relative humidity, the higher the MC of the wood.
Extra Resource: Video on Relative Humidity and Moisture Content
Moldings
Wood trim or transition pieces that finish the look of an installed floor.
Muratic Acid
A diluted acid used to neutralize alkalinity of concrete subfloors.
Nail Down
A flooring installation method that uses nails to attach flooring to a subfloor.
Nailing Shoe (or Nailing Plate)
Often required for fastening factory-finished flooring, a nailing shoe attaches to a blind-nailing machine to broaden the impact area.
Natural Stain
Clear wood finish that allows the natural colors and grain to show.
Nominal Size
The size by which lumber is known and sold in the market.
Nosing
A type of wood molding used to cover the outside corner of a step, usually used on landings. Nosing is milled to meet the hardwood floor in the horizontal plane and to meet the riser in the vertical plane.
NWFA
Oriented Strand Board (OSB)
OSB is a structural engineered wood manufactured from waterproof heat-cured adhesives and rectangular-shaped wood strands arranged in cross-oriented layers. This results in strength and performance characteristics similar to plywood. OSB is commonly used as an underlayment or subfloor material.
Overwood/Underwood
A flooring condition in which there is a perceived misalignment of the flooring surface, with some wood pieces raised above adjacent pieces leaving a slightly uneven surface. Also called lippage.
Parquet
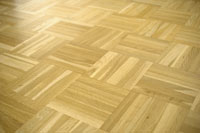 A patterned floor created by inlaid woodwork in geometric forms, sometimes of contrasting woods.
Particleboard
Also known as chipboard, an engineered wood product manufactured from wood chips, sawmill shavings, or sawdust and a synthetic resin or other binder that is pressed and extruded. Particleboard is a composite material and includes Flakeboard, Oriented Strand Board and Waferboard.
Patina
The change in wood color from light exposure and other natural elements over time.
Photo-sensitive
The extent to which a wood flooring’s natural color will lighten or darken after long-term exposure to natural light.
Pin-Worm Hole
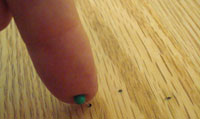 A small round hole in hardwood flooring, not more than 1/16-inch (1.5626MM) in diameter, made by a small wood-boring insect.
Pith
The small, soft core occurring near the center of a tree trunk, branch, twig or log. First
growth.
Plain Sawn
See Flat-Sawn.
Planer Bite
Results when a planer knife cuts a deeper than intended groove into the surface of the wood.
Plank
Solid or Engineered boards 3″ and wider designed to be installed in parallel rows.
Plugs
Used in wood flooring to cover countersunk screws or for decorative purposes.
Ply (plies)
A layer of wood, typically used to describe engineered hardwood construction layers.
Plywood
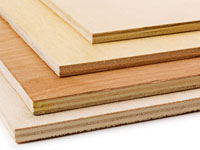 A structural material consisting of cross-directional veneers and/or layers of wood glued cemented together for dimensional stability and used as underlayment for vinyl flooring.
Polyurethane
A type of protective finish that does not require waxing commonly used on hardwood flooring.
Prefinished
Hardwood floors that are stained with color and sealed with a protective finish by the manufacturer prior to installation.
Printed Construction
A printing process that provides accurate reproductions of a wide variety of patterns and designs in intricate detail. Also known as the “rotogravure” process.
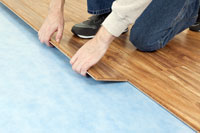
Pull Bar
Tool used to tighten tongue and groove joints when installing laminate flooring.
Quarter Round Molding
Molding used between cabinets and flooring to cover gaps.
Quarter Sawn
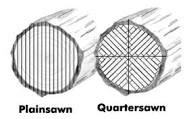 When lumber is cut from logs, it is typically cut in one of three ways: quarter sawn, rift sawn or flat (plain) sawn, depending on how the log is oriented to the saw. In quarter sawn, the log is first quartered lengthwise, resulting in wedges with a right angle ending at approximately the center of the original log. Each quarter is then cut separately, resulting in boards with the annual rings mostly perpendicular to the faces and a distinctive ray and fleck figure.
Radiant Heating
Typically installed under stone and ceramic floors to keep floors at a comfortable temperature.
Raised Grain
The dense summerwood is raised above the softer springwood resulting in a face finish that is rough to the touch.
Random Length/Width
Flooring sold in cartons where boards are different lengths or widths.
Rays, Wood
See Flecks.
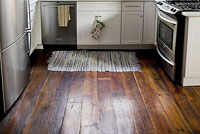
Reclaimed Wood
 Wood salvaged from an old structure that is refinished and used for another purpose, such as floors, cabinetry or furniture.
Reducer Strip
Molding that is grooved on one edge and tapered or feathered on the other. Used to finish the space between hardwood flooring and other flooring surfaces.
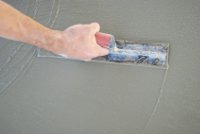
Refinish
Sanding down a wood floor and finishing it again in order to reduce the appearance of wear or change the stain color.
Relative Humidity
The amount of water vapor present in air expressed as a percentage of the amount needed for saturation at the same temperature. Relative humidity is usually considered on the basis of the weight of the vapor, but for accuracy should be considered on the basis of vapor pressures.
Extra Resource: Accurate Relative Humidity Testing Article
Rift Sawn
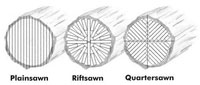 When lumber is cut from logs, it is typically cut in one of three ways: quarter sawn, rift sawn or flat (plain) sawn, depending on how the log is oriented to then saw. Rift sawn is the most expensive and least common, manufactured by sawing perpendicular to the log’s growth rings and resulting in a linear grain pattern with no flecking.
Ring-Porous Woods
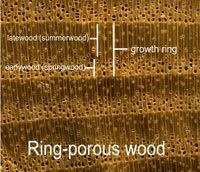 A group of hardwoods in which the pores are comparatively large at the beginning of each annual growth ring and decrease in size toward the outer portion of the ring. The large pores are springwood and the smaller pores are summerwood.
Ring Shank Nail
A type of nail with either annual or helical threads in the shank that have smaller diameters than common nails of similar length. Ring shank nails are used for underlayment installation to improve the holding characteristics.
S4S (Surface-4-Sides)
Flooring that isn’t tongue-and-grooved. May also refer to square-edge strip flooring that is face-nailed when installed.
Sapwood
A tree’s new wood used for moving water and minerals into the leaves. As newer rings of sapwood are produced, its inner cells lose their vitality and turn into heartwood.
Sawn
See Flat Sawn, Quarter sawn and Rift Sawn.
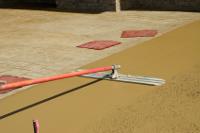
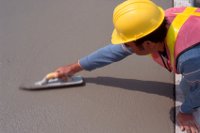
Screed
Usually a 2″ by 4″ inch piece of wood laid flat side down and attached to a concrete subfloor to provide a nailing surface for tongue-and-groove strip flooring or a wood subfloor (also called sleeper).
Shake
A separation along the grain of wood, the greater part of which occurs between the annual growth rings.
Sheathing
 Sheets of plywood placed over the exterior studding, rafters or subfloor of a structure.
Shoe Molding
Humidity-resistant molding for high traffic areas.
Side-Matched
In tongue-and-groove flooring, the individual pieces have a tongue milled on one side and a groove milled on the opposite side. When placed side-by-side, the tongue of one piece fits into the groove of the next piece. See End-Matched and Tongue-and-Groove.
Site-finished
Hardwood floors that are stained with color and sealed with a protective finish at the installation site, as opposed to pre-finished.
Slats
See Fillets.
Sleeper
Another name for screeds.
Slip-Tongue/Spline
A small strip of wood or metal used to reverse or change direction in installing standard tongue-and-groove strip flooring.
Softwoods
Wood of coniferous, needle/cone bearing trees as opposed to that of deciduous, or hardwoods. The term does not refer to the actual softness of the wood.
Solid Board Group 1
A designation of a certain species of wood based on density, strength and stiffness.
Solid Wood
Boards manufactured from one piece of wood, unlike engineered wood, which is formed from multiple plies.
Species
Refers to the many types of wood, such as oak, cherry or walnut, differentiated by wood grain, density, color and more.
Extra Resource: Article on Wood Species
Specifications
The detailed selections of the architect, covering all of the material and labor methods to be used in erecting a building. Usually prescribe types of material, sources, and often lists method of application or installation.
Split
 Separations of wood fiber running parallel to the grain.
Square Edge
Edges of boards created to lay flush to the next board in order to decrease the appearance of lines between boards.
Square Nose
Trim used along the walls of floating floors.
Squares
Parquet flooring units, usually composed of an equal number of slats.
Stair Nosing
Molding applied to the forward edge of stairs, step-downs, and landings, creating a rounded finish.
Streaks
See Mineral Streaks.
Strip Flooring
Boards less than 3 inches in width installed in parallel rows. The strips are side-matched and end-matched (tongue-and-grooved) and are for nail-down installation directly to wood or plywood subfloors, or over wood screeds on concrete slab construction.
Structural Integrity
A term often used in a guarantee or warranty to assure the floor’s composition/construction will remain intact.
Subfloor
 The structural layer intended to provide the home’s floor support, which may receive floor coverings directly if the surface is appropriate, or indirectly via an underlayment if its surface is not suitable.
Substrate
A smooth surface used beneath floor covering – such as concrete, underlayment, or existing resilient flooring.
Suspended Substrate
Location of a finished floor that is not in contact with the ground and which provides at least 18 inches of well-ventilated space.
Surface
The outside or exterior boundary of any substance. One is said to surface the work when it is rubbed or sanded to a smooth, level plane.
Taber
Measure of the wear of flooring through resistance.
Texture
Flooring surface’s look and feel, which can range from silky smooth to distressed.
Threshold
Finishing piece applied to the area where a wood floor transitions to another flooring level or another flooring type.
T-Molding
Piece that finishes the space between two areas of wood flooring.
Tongue-and-Groove
A tongue is milled on one edge of a flooring board, and a groove is cut on the opposite edge. As the flooring is installed, the tongue of each strip fits into the groove of the adjacent strip. See End-Matched and Side-Matched.
Trim
Finish materials used at the floor of rooms, such as baseboard, base shoe, quarter
Round.
Trowel Fill
Method to fill an entire floor or large area.
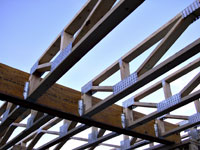
Truss
Support that helps keep floors level and sturdy.
Transition Strips
Wood piece that bridges two floors of different heights to equalize them.
Ultraviolet Light
Part of the light spectrum that cannot be seen by the human eye.
Underlayment
Layer of material installed on or over a subfloor that provides a surface suitable to receive a new floor covering.
Vapor Impermeable Membrane
A material or covering that limits the passage of moisture and has a permeance rating of .15 perms or less.
Extra Resource: Article on Vapor Barrier/Vapor Retarder
Vapor Permeable Membrane
A material or covering that permits the passage of moisture and has a permeance rating of 5 perms or greater. See Vapor Retarder.
Vapor Retarder
A material or covering that slows the rate of moisture movement to the hardwood to protect the flooring and reduce or prevent cupping or other moisture-related problems. National Wood Flooring Association (NWFA) guidelines define an acceptable vapor-retarder as having a vapor permeance (or perm rating) between 0.7 and 50.
Extra Resource: Article on Vapor Barrier/Vapor Retarder
Varnish
A finish made of oils that are cured slowly over time.
Tip: Close windows of the room you are varnishing to prevent layers of dust and insects from collecting on fresh varnish.
Veneer
A thin layer of real hardwood glued to a core to create engineered hardwood flooring.
Volatile Organic Compounds (VOCs)
Refers to carbon-based chemicals that easily evaporate at room temperature and can trigger allergic reactions, asthma, and upper respiratory infections. Thousands of different VOCs are produced and used in our daily lives. Some common examples in building materials include: carpets and adhesives; composite wood products; paints; sealing caulks; solvents; upholstery fabrics; varnishes; and vinyl floors.
Tip: Always wear a fume/vapor mask when using or applying finish to your floor.
Warping
 Any distortion of a piece of wood from its true plane. Types include: bow (a warp along the length of the face of the wood); crook (a warp along the length of the edge of the wood); kink (a localized crook, often due to a knot); cup (a warp across the width of the face, in which the edges are higher or lower than the center of the wood); and twist (a distortion in which the two ends do not lie on the same plane).
Wear Layer
The portion of a floor covering that contains or protects the pattern effect.
White Wash
A cost-effective wood finish that cures over time to provide a chalky, worn look.
Wide Plank
Board widths that are 5” or greater.
Width
The width of the individual wood boards that make up the floor. “Strips” are narrow boards measuring less than 3 inches wide. “Planks” are wider boards, measuring 3 inches wide or more.
Wire-Brushed
A distressing technique to give wood boards a time-worn look.
Working Pressure
The pneumatic pressure range specified in pounds per square inch (PSI) to optimally run an air tool.
Wood stain (stain)
A type of paint that is very “thin,” or low in viscosity and formulated so pigment penetrates the surface rather than remaining in a film on top of the surface.
Hardwood Flooring Reference Tool & Definitions
read more
Why Flooring Professionals Must Always Test For Excessive Moisture And Alkalinity
Moisture can cause a wide range of hardwood flooring problemsWhy Flooring Professionals Must Always Test For Excessive Moisture And Alkalinity It’s no mystery. The leading cause of flooring failures is moisture. Industry experts say approximately 85% of all...
Common Hardwood Flooring Problems: Prevention and Cures for Installation and Finishing Issues
Prevention and Cures for Installation and Finishing IssuesAccording to the National Wood Flooring Association, the following are common problems encountered when installing and/or finishing hardwood flooring. We’ve included prevention tips as well as cures to help you...